FlinkでLLMを直接呼び出す
 MLモデルをApache F
本シリーズの最新パートでは、Apache FlinkとLarge Language Model (LLM)を統合します。
Flink SQLを使用して、LLMを直接呼び出し、product reviewsの要約を作成します。
Apache Flink が最新バージョンで大規模言語モデル(LLM)を直接 SQL パイプラインから呼び出せる仕組みが明らかになった。この記事では、Flink を使って製品レビューを要約する AI システムの構築方法を解説する。
Flink と LLM の統合
Flink は最新バージョンで機械学習モデルを SQL パイプラインから直接呼び出すことができる。これにより、カスタム Java コードや外部推論サービスを必要とせず、純粛な Flink SQL で処理が可能になった。この仕組みを活用して、製品レビューを要約する AI システムを構築する。
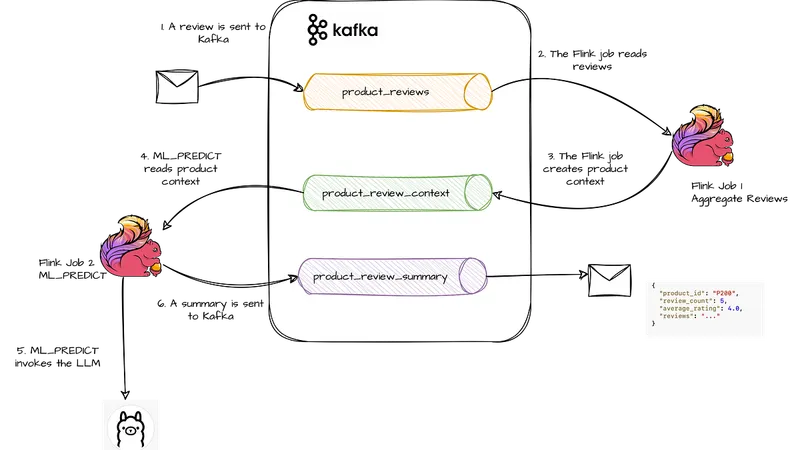
レビューの集約処理
最初の Flink ジョブでは、製品レビューを Kafka から読み込み、製品ごとに1分間の時間区間で集約する。集約結果は、LLM が要約処理を行うためのコンパクトなコンテキストとして使用される。このコンテキストには、レビュー数、平均評価、レビュー本文などが含まれる。
LLM による要約処理
2番目の Flink ジョブでは、集約されたコンテキストをもとに LLM が要約を生成する。生成された要約は product_review_summary テーブルに書き込まれる。このアーキテクチャは、ストリーミングシステムと AI の統合において重要なパターンを示している。
まとめ
Flink は機械学習モデルを SQL パイプラインから直接呼び出すことで、AI とデータ処理の統合をより簡単にしている。この技術は今後、さまざまな分野での応用が期待される。
原文の冒頭を表示(英語・3段落のみ)
13 min read1 hour ago--Previous parts:Part 1: Filtering data from KafkaPart 2: Running on Kubernetes with the OperatorPart 3: SQL instead of JavaPart 4: SQL and AvroPart 5: Managing StateIntegrating ML Models into Data PipelinesLet’s leave aside boring SELECTs and JOINs and do something more exciting.In the latest versions of Apache Flink, machine learning models become first-class citizens and can be invoked directly from SQL pipelines. No custom Java code, no user-defined functions, and no external inference services. Everything can be done using pure Flink SQL.In this part of the Hands-On with Flink series, we will build a simple system that summarizes product reviews using a Large Language Model (LLM).The idea is illustrated in the diagram below.Product reviews arrive as events in the product_reviews Kafka topic. Our first Flink job continuously aggregates reviews for each product and produces a compact context event into the product_review_context topic. These context events contain information such as the number of reviews, average rating, and the collected review texts.A second Flink job consumes the aggregated context events and uses an LLM to generate a concise summary for each product. The generated summaries are then written to the product_review_summary topic.This architecture demonstrates an important pattern when integrating AI with streaming systems: Flink is responsible for collecting, filtering, aggregating, and preparing the context, while the LLM focuses on interpreting that context and generating insights.As usual, everything will run locally on our machine. And yes, that includes the LLM.The source code for this part is here.New Flink AI ConstructsBefore diving into the installation steps, let’s first look at the Flink SQL features that we will use in this example.The first part of the pipeline is relatively straightforward. We will read product reviews from Kafka and aggregate them into a compact product context. This context will later be sent to the LLM.Reading raw reviewsFirst, we define a source table over the product_reviews Kafka topic:CREATE TABLE product_reviews ( review_id STRING, product_id STRING, product_name STRING, rating INT, review_text STRING, proc_time AS PROCTIME()) WITH ( 'connector' = 'kafka', 'topic' = 'product_reviews', 'properties.bootstrap.servers' = 'host.docker.internal:9092', 'properties.group.id' = 'product-reviews-source', 'scan.startup.mode' = 'earliest-offset', 'format' = 'json');This table represents raw review events arriving into Kafka. Most fields are self-explanatory: review ID, product ID, product name, rating, and review text.The only new field is:proc_time AS PROCTIME()This is a computed column. It tells Flink to attach the current processing time to each incoming record. We will use this timestamp to group reviews into short time intervals.Creating product contextNext, we define the output table for aggregated product context:CREATE TABLE product_review_context ( product_id STRING, product_name STRING, window_start TIMESTAMP(3), window_end TIMESTAMP(3), review_count BIGINT, average_rating DOUBLE, negative_reviews BIGINT, positive_reviews BIGINT, reviews STRING) WITH ( 'connector' = 'kafka', 'topic' = 'product_review_context', 'properties.bootstrap.servers' = 'host.docker.internal:9092', 'format' = 'json');This topic will not contain individual reviews. Instead, it will contain aggregated context for each product.For each product and time interval, Flink will produce information such as:how many reviews were receivedthe average ratingthe number of negative reviewsthe number of positive reviewsthe review texts concatenated into one fieldThe window_start and window_end fields represent the time boundaries of the aggregation interval. We have not covered Flink windows in detail yet, so for now it is enough to understand them as the beginning and end of the time bucket in which reviews are collected.Aggregating reviewsFinally, we define the streaming aggregation:INSERT INTO product_review_contextSELECT product_id, MAX(product_name) AS product_name, window_start, window_end, COUNT(*) AS review_count, AVG(rating) AS average_rating, SUM(CASE WHEN rating <= 2 THEN 1 ELSE 0 END) AS negative_reviews, SUM(CASE WHEN rating >= 4 THEN 1 ELSE 0 END) AS positive_reviews, LISTAGG( CONCAT( 'Rating: ', CAST(rating AS STRING), '. Review: ', review_text ), ' | ' ) AS reviewsFROM TABLE( TUMBLE( TABLE product_reviews, DESCRIPTOR(proc_time), INTERVAL '1' MINUTE ))GROUP BY product_id, window_start, window_end;This query continuously reads incoming reviews and groups them by product and by one-minute processing-time windows.For each product in each one-minute interval, it calculates simple statistics and also creates a textual review context using LISTAGG.This is important for the LLM part. We do not want to send every single review to the model separately. Instead, Flink first prepares a compact context event, and only this context event will be passed to the LLM.The output event will look conceptually like this:{ "product_id": "P200", "product_name": "NoiseCancel Headphones", "review_count": 5, "average_rating": 4.0, "negative_reviews": 0, "positive_reviews": 4, "reviews": "Rating: 5. Review: Excellent sound quality... | Rating: 4. Review: Great noise cancellation..."}Creating a modelAnd now comes the interesting part.We will define a model backed by Llama 3.1, running locally in Ollama. For this, Flink provides a new SQL construct:CREATE MODELThe model will take the aggregated product review context as input and return a generated summary as output.In our case, the input field is:reviews STRINGand the output field is:content STRINGThe model behavior is controlled by the system prompt:You are a product analyst. Analyze the reviews and return a valid JSON only with fields: sentiment, key_strengths, key_complaints, summary, recommended_action.Here is the complete model definition:CREATE MODEL product_review_summarizerINPUT (reviews STRING)OUTPUT (content STRING)WITH ( 'provider' = 'openai', 'endpoint' = 'http://ollama:11434/v1/chat/completions', 'api-key' = 'ollama', 'model' = 'llama3.1', 'system-prompt' = 'You are a product analyst. Analyze the reviews and return a valid JSON only with fields: sentiment, key_strengths, key_complaints, summary, recommended_action.');Although the provider is configured as openai, we are not calling OpenAI here. Ollama exposes an OpenAI-compatible API, so Flink can use the same provider interface to call our locally running model.The endpoint:http://ollama:11434/v1/chat/completionspoints to the Ollama service inside the Kubernetes cluster.Creating the summary sinkThe final piece of our pipeline is a sink table for the summaries generated by the LLM.The table is backed by the product_review_summary Kafka topic. Each record will contain the original product statistics together with the summary returned by the model.CREATE TABLE product_review_summary ( product_id STRING, product_name STRING, review_count BIGINT, average_rating DOUBLE, negative_reviews BIGINT, positive_reviews BIGINT, llm_summary STRING) WITH ( 'connector' = 'kafka', 'topic' = 'product_review_summary', 'properties.bootstrap.servers' = 'host.docker.internal:9092', 'format' = 'json');At this point, we have all the building blocks in place:A source table reading raw reviews from Kafka.An aggregation job producing product context.A model definition backed by Llama 3.1 running in Ollama.A sink table for storing generated summaries.Invoking the ML Model from FlinkThe only missing piece is connecting the product context with the model. This is where the second new Flink AI construct comes into play:ML_PREDICTJust as CREATE MODEL defines a model, ML_PREDICT invokes it directly from a SQL pipeline.In this step, we read aggregated product context events from Kafka, call the LLM for each context event, and write the generated summary back to Kafka.INSERT INTO product_review_summarySELECT product_id, product_name, review_count, average_rating, negative_reviews, positive_reviews, content AS llm_summaryFROM ML_PREDICT( TABLE product_review_context, MODEL product_review_summarizer, DESCRIPTOR(reviews));The important part is this:ML_PREDICT( TABLE product_review_context, MODEL product_review_summarizer, DESCRIPTOR(reviews))Here, product_review_context is the input table, product_review_summarizer is the model defined earlier, and reviews is the field passed to the model as input.For every product context event, Flink calls the LLM and receives a generated response in the content field. We then rename this field to llm_summary and write the result into the product_review_summary Kafka topic.Now that we understand the architecture and the new Flink AI constructs, it’s time to put everything into practice.Fair warning: there is quite a bit of setup involved.Reviews → Kafka → Flink → LLM → KafkaAs we work through the deployment, don’t lose sight of the main idea behind the example:Flink creates the context. The LLM explains it.This separation of responsibilities is what makes the combination so powerful. Flink excels at collecting, filtering, aggregating, and enriching streaming data, while the LLM focuses on interpreting the prepared context and generating insights.Upgrading the Flink Kubernetes OperatorIn this article, we are using some of the newest Flink SQL features. Therefore, we also need a recent version of the Flink Kubernetes Operator.Assuming that the operator is not installed yet, we first add the Helm repository for version 1.15.0:helm repo add flink-operator-repo \ https://downloads.apache.org/flink/flink-kubernetes-operator-1.15.0/helm repo updateNext, we install the required Custom Resource Definitions (CRDs).In my local setup, the Helm chart did not install all CRDs that were needed by the operator, so I added the missing ones manually:kubectl apply -f https://raw.githubusercontent.com/apache/flink-kubernetes-operator/main/helm/flink-kubernetes-operator/crds/flinkdeployments.flink.apache.org-v1.ymlkubectl apply -f https://raw.githubusercontent.com/apache/flink-kubernetes-operator/main/helm/flink-kubernetes-operator/crds/flinkstatesnapshots.flink.apache.org-v1.ymlkubectl apply -f https://raw.githubusercontent.com/apache/flink-kubernetes-operator/main/helm/flink-kubernetes-operator/crds/flinkbluegreendeployments.flink.apache.org-v1.ymlFinally, we install the operator itself:helm install flink-kubernetes-operator \ flink-operator-repo/flink-kubernetes-operator \ --namespace flink \ --create-namespace \ --set webhook.create=falseI disable the webhook because this is a local development environment and I want to keep the setup as simple as possible.Preparing Kafka TopicsAs usual, we will run Kafka in Docker. For this exercise, we only need a Kafka broker. Since we will use JSON for serialization, there is no need to deploy Schema Registry.Our docker-compose.yml contains two containers:Kafka — the message brokerAKHQ — a web-based UI for inspecting topics, messages, and consumer groupsLet’s start the environment:docker compose up -dNext, create the Kafka topics that will be used throughout the example:product_reviews – incoming product reviewsproduct_review_context – aggregated review context produced by Flinkproduct_review_summary – summaries generated by the LLMThe topics can be created using AKHQ tool or from the scripts inside the Kafka container. We will use these topics throughout the rest of the article as data flows from raw reviews, through Flink aggregations, and finally into LLM-generated summaries.Preparing the LLMFor this example, we will use Ollama to run the LLM locally. Instead of calling an external cloud API, we will deploy Ollama directly into our Kubernetes environment.The ollama.yml descriptor contains:one Kubernetes Deployment using the Ollama imageone Kubernetes Service exposing Ollama inside the clusterLet’s install it into the flink namespace:kubectl apply -f ollama.yml -n flinkAfter the pod is running, we also need to pull the actual model. Ollama provides the runtime, but the model itself has to be downloaded separately.For this example, we will use Llama 3.1:kubectl exec -it deployment/ollama -n flink -- ollama pull llama3.1We can test ollama directly by using port-forwardingkubectl port-forward svc/ollama 11434:11434 -n flinkIn another terminal:curl http://localhost:11434Expected response:Ollama is runningLater, after we deploy the Flink SQL session, we can verify connectivity from Flink to Ollama.Building a Custom Flink ImageTo use Flink’s new AI capabilities, we need a custom Flink image containing several additional libraries:Kafka client libraryKafka connector for FlinkOpenAI model connector, which enables the CREATE MODEL and ML_PREDICT SQL statementsThe Dockerfile looks as follows:FROM flink:2.1.2-java17USER rootARG FLINK_VERSION=2.1.2ARG KAFKA_CONNECTOR_VERSION=4.0.1-2.0ARG KAFKA_CLIENTS_VERSION=3.9.0# Kafka connectorADD https://repo1.maven.org/maven2/org/apache/flink/flink-connector-kafka/${KAFKA_CONNECTOR_VERSION}/flink-connector-kafka-${KAFKA_CONNECTOR_VERSION}.jar /opt/flink/lib/ADD https://repo1.maven.org/maven2/org/apache/kafka/kafka-clients/${KAFKA_CLIENTS_VERSION}/kafka-clients-${KAFKA_CLIENTS_VERSION}.jar /opt/flink/lib/# Flink AI / OpenAI model connectorADD https://repo1.maven.org/maven2/org/apache/flink/flink-model-openai/${FLINK_VERSION}/flink-model-openai-${FLINK_VERSION}.jar /opt/flink/lib/# Fix ownershipRUN chown flink:flink /opt/flink/lib/*.jarUSER flinkThe most important dependency is flink-model-openai. Despite its name, it is not limited to OpenAI models. It works with any OpenAI-compatible API, including Ollama, which is exactly what we will use later in this article.Once the Dockerfile is ready, build the image:docker build -t localhost:5001/flink-ai-demo:2.1.2 .And push it to the local registry:docker push localhost:5001/flink-ai-demo:2.1.2The image is now ready to be used by our Flink SQL session cluster.Deploying the Flink ClusterNow we can deploy the Flink cluster into our Kubernetes environment.We already know the basic deployment process from the previous parts, but this time there are two important changes in the deployment descriptors:We use our custom image, localhost:5001/flink-ai-demo:2.1.2, for both the Flink SQL session cluster and the SQL Gateway.In the FlinkDeployment, we set the Flink version to:flinkVersion: v2_1This is important because Flink 2.1 uses the newer configuration format and also provides the SQL features we need for model inference.After updating the descriptors, we deploy the Flink SQL session cluster:kubectl apply -f flink-sql-deployment.yaml -n flinkThen we deploy the SQL Gateway:kubectl apply -f sql-gateway.yaml -n flinkOnce both components are running, we will be able to submit Flink SQL statements through the SQL Gateway API.Finally, let’s verify that everything is running correctly. Check the namespace:kubectl get pods -n flinkYou should see something similar to:NAME READY STATUS RESTARTS AGEflink-kubernetes-operator-7b7c9bbfb8-kdnkj 1/1 Running 0 85sflink-sql-gateway-7969db4f45-8jq46 1/1 Running 0 3sflink-sql-session-84c796f566-798qt 1/1 Running 0 82sollama-947448f9f-8nwgg 1/1 Running 0 21hIf all pods are in the Running state, we are ready to start submitting SQL statements and building our AI-powered streaming pipeline.Deploying the Data PipelineNow let’s deploy the Flink SQL queries that we discussed earlier.First, start port-forwarding for the SQL Gateway so that we can submit SQL statements over HTTP:kubectl port-forward deployment/flink-sql-gateway 8083:8083 -n flinkOpen another terminal and create a SQL Gateway session:curl -X POST http://localhost:8083/v1/sessions \ -H 'Content-Type: application/json' \ -d '{}'You should receive a response similar to this:{ "sessionHandle": "4e92613e-9f4a-4ac7-82bf-34a35c4c73ad"}Use your own sessionHandle in the following commands.Create the source table:curl -X POST http://localhost:8083/v1/sessions/4e92613e-9f4a-4ac7-82bf-34a35c4c73ad/statements \ -H "Content-Type: application/json" \ -d '{ "statement": "CREATE TABLE product_reviews (\n review_id STRING,\n product_id STRING,\n product_name STRING,\n rating INT,\n review_text STRING,\n proc_time AS PROCTIME()\n) WITH (\n '\''connector'\'' = '\''kafka'\'',\n '\''topic'\'' = '\''product_reviews'\'',\n '\''properties.bootstrap.servers'\'' = '\''host.docker.internal:9092'\'',\n '\''properties.group.id'\'' = '\''product-reviews-source'\'',\n '\''scan.startup.mode'\'' = '\''earliest-offset'\'',\n '\''format'\'' = '\''json'\''\n);" }'Create the product context table:curl -X POST http://localhost:8083/v1/sessions/4e92613e-9f4a-4ac7-82bf-34a35c4c73ad/statements \ -H "Content-Type: application/json" \ -d '{ "statement": "CREATE TABLE product_review_context (\n product_id STRING,\n product_name STRING,\n window_start TIMESTAMP(3),\n window_end TIMESTAMP(3),\n review_count BIGINT,\n average_rating DOUBLE,\n negative_reviews BIGINT,\n positive_reviews BIGINT,\n reviews STRING\n) WITH (\n '\''connector'\'' = '\''kafka'\'',\n '\''topic'\'' = '\''product_review_context'\'',\n '\''properties.bootstrap.servers'\'' = '\''host.docker.internal:9092'\'',\n '\''properties.group.id'\'' = '\''product-review-context-llm'\'',\n '\''scan.startup.mode'\'' = '\''earliest-offset'\'',\n '\''format'\'' = '\''json'\''\n);" }'This table is used twice: first as a sink for the aggregation job and later as a source for ML_PREDICT. Because it will be consumed by the second job, we also define a Kafka consumer group using properties.group.id.Create the aggregation job:curl -X POST http://localhost:8083/v1/sessions/4e92613e-9f4a-4ac7-82bf-34a35c4c73ad/statements \ -H "Content-Type: application/json" \ -d '{ "statement": "INSERT INTO product_review_context SELECT product_id, MAX(product_name) AS product_name, window_start, window_end, COUNT(*) AS review_count, AVG(rating) AS average_rating, SUM(CASE WHEN rating <= 2 THEN 1 ELSE 0 END) AS negative_reviews, SUM(CASE WHEN rating >= 4 THEN 1 ELSE 0 END) AS positive_reviews, LISTAGG(CONCAT('\''Rating: '\'', CAST(rating AS STRING), '\''. Review: '\'', review_text), '\'' | '\'') AS reviews FROM TABLE(TUMBLE(TABLE product_reviews, DESCRIPTOR(proc_time), INTERVAL '\''1'\'' MINUTE)) GROUP BY product_id, window_start, window_end;" }'This statement starts a long-running Flink job. It continuously reads raw reviews, aggregates them into one-minute product contexts, and writes the result to the product_review_context topic.Create the model:curl -X POST http://localhost:8083/v1/sessions/4e92613e-9f4a-4ac7-82bf-34a35c4c73ad/statements \ -H "Content-Type: application/json" \ -d '{ "statement": "CREATE MODEL product_review_summarizer INPUT (reviews STRING) OUTPUT (content STRING) WITH ( '\''provider'\'' = '\''openai'\'', '\''endpoint'\'' = '\''http://ollama:11434/v1/chat/completions'\'', '\''api-key'\'' = '\''ollama'\'', '\''model'\'' = '\''llama3.1'\'', '\''system-prompt'\'' = '\''You are a product analyst. Analyze the reviews and return a valid JSON only with fields: sentiment, key_strengths, key_complaints, summary, recommended_action.'\'' );" }'Create the summary sink:curl -X POST http://localhost:8083/v1/sessions/4e92613e-9f4a-4ac7-82bf-34a35c4c73ad/statements \ -H "Content-Type: application/json" \ -d '{ "statement": "CREATE TABLE product_review_summary (\n product_id STRING,\n product_name STRING,\n review_count BIGINT,\n average_rating DOUBLE,\n negative_reviews BIGINT,\n positive_reviews BIGINT,\n llm_summary STRING\n) WITH (\n '\''connector'\'' = '\''kafka'\'',\n '\''topic'\'' = '\''product_review_summary'\'',\n '\''properties.bootstrap.servers'\'' = '\''host.docker.internal
※ 著作権に配慮し、引用は冒頭3段落までです。続きは元記事をご覧ください。